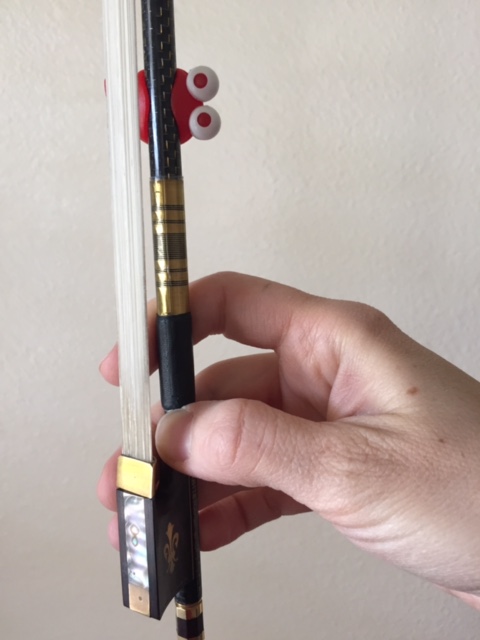
GUESS WHAT I FOUND!!?? I was browsing Amazon.com the other day and found these cute little 'Wine Watchers Wine Charms'...
They reminded me of little bow markers that some Suzuki teachers put on student bows to get them to play in a certain section of the bow. Little bow markers are great for teaching bow distribution and they make bow games more fun when students can watch a little critter on their bow. I ordered them and they came in the mail today. They are so cute!
I put them on my bow and they work perfectly. They are super easy to put on the bow and they stay put.
As I pulled my bow, the little critter stopped my stroke so I had to stay in the parameters I set. Also, they were fun to watch as I bowed, so I think students would love to have them on their bows. These little critters are perfect for helping students keep their eyes on their bows for straight bowing. Also they will help students become aware of how the bow is traveling. Amazon also sells a sloth version of these and I just ordered them. I just wish they were less expensive so I could buy a bunch for all of my beginners! Guess we'll have to share.
It's finally finished - my book for teaching shifting in string orchestra! I started working on this last year because I HATED teaching shifting in my orchestra class. The method books I used had shifting exercises for my 2nd year players, but I found that my students would get frustrated trying to play those pages because they weren't ready. Students need time to internalize the motions for shifting and they needed simple exercises to help them learn to read notes in a new position.
I haven't been able to depend on standard method books for teaching shifting because the exercises in those books move too quickly. They contain tricky rhythms which draw student focus away from the task at hand...shifting! I found myself skipping sections about shifting and feeling guilty that my students were not proficient in that area.
My frustrations with teaching shifting changed last year when I started using many of the exercises in this book with my 2nd year students. I also switched method books...I now use String Explorer book 1 for my beginners because that book takes students further in technique than any other book. For my 2nd year players, I use String Basics book 2. It's not very hard...we get through the book in about 1/2 a year. Students get really good at playing flats and extensions - which is my goal for them during their 2nd year. Then we have time to take a break from our method book and focus on shifting for a term. I didn't spend tons of time each day....maybe 5-10 minutes. It didn't take long for my students to play in 3rd position with great intonation. My 3rd year students are using String Basics book 3 -which contains a lot of 3rd position. After using the exercises in 'Exploring Shifting for String Orchestra,' I feel my students will now be well-prepared to easily master the shifting regimen in book 3.
Here's my favorite part about teaching shifting to my 2nd year players.....it helps the students stay super motivated! I purchased a couple of pieces for them to play that had some shifting: 'American Princess' by Bob Phillips and 'Impact' by Bob Phillips. Both pieces are gorgeous and I played the audio for my students so they would really want to learn the music. My class fell in love with both pieces and they were willing to work hard to master them to sound amazing. The great thing about those pieces is that every section of the orchestra gets to shift and the melodies and harmonies are fun to play in position! I even got out a cello and learned the cello part myself because the music is so beautiful.
Thanks to the shifting work we had done, my students excelled at learning our concert music. It was a lot of work..don't get me wrong....but they were able to do it with great intonation and musical phrasing. When we performed, I was in tears, the audience was in tears, and students felt such a sense of accomplishment. It is now one of my happiest performance memories and I'm so proud of my students....and it all started with a willingness to teach shifting in a way that all students could achieve success.
My book contains a 50 page teacher manual with tips for teaching shifting and 18 page student books for violin, viola, cello and bass (123 pages total). I am not selling a hard printed copy of this book. You can purchase a PDF downloadable version HERE or HERE. The beauty of a printable book is that you can print as many as you need for your entire class at a very low price. You can also pick and choose which pages to do if you don't want to use the entire book. It is a lot cheaper to print your own shifting workbook than to buy a hard copy of a book for every student. Also if you find any errors, feel free to email me and I will fix it and re-send the file.
I'm the first to admit that I'm not a bass player. Bass shifting can get pretty crazy. I have some really smart bass students in my class who enjoyed figuring out higher positions. For my bass players that are slower learners, I allowed them to change fingerings and play more in 1st position. As a teacher, you can change/adjust fingerings as needed depending on student ability levels.
Read the preface for more info about the book and a sample of the first couple pages below:
This idea isn't totally new..I've heard of teachers using a variety of tubular objects for students to practice straight bowing...such as toilet paper rolls, paper towel rolls, PVC pipe, and even pool noodles (cut into chunks and used with a wooden dowel). Usually, these types of bowing exercises are done away from the instrument. For example, young violin/viola students place a tube on their shoulder while bowing inside the tube....cello players sometimes put tubes on their knees and place bows inside. The reason why I like this 'new' object for practicing bowing is that it can be placed directly on the string for bowing practice without making a bit of sound...plus it's so soft, there's no way it would damage the instrument. It's the best thing I've ever seen for practicing straight bows! It would be perfect for an orchestra/strings classroom because students can do this themselves as the teacher monitors...or a teacher could have students practice in pairs (one student holds the tube, the other bows).
Anyway, I'm sure you're getting curious...what is the object that is rocking my world???
PAINT ROLLERS!
They work perfectly for cello students. The left hand can hold the roller in place as it sits softly on the string while the bow hand practices various rhythms. You could even have students 'roll' the paint roller to specific strings to practice bow levels. Why practice straight bows away from the instrument? This way seems so much more practical.
Violin and viola students might need a person to hold the roller...but there is a way to make the roller stay in place on the string and still be flexible enough to allow students to roll the bow inside the roller to specific strings. To do this, I used a large rubber band - many of you probably have these large sized rubber bands on hand for shoulder rests. By putting the band around the violin length-wise, the roller easily slides underneath and will stay put even as students rock to different strings.
I found these rollers a Wal-Mart for $2.97 for a 3-pack. I plan on buying quite a few of these for my beginners. There are many ways to make silent bowing more fun. You could teach simple rhythms and have students practice bowing rhythms...teach bow direction...have students bow silently to fun music/popular tunes for bow exercises. You could even teach bow distribution using these babies...what a good visual to help students really see how much bow they are using.
So what do you think? Does this rock your world, too?...or am I just an orchestra geek?
I'm sure you've all said it before...."Stop Plucking!" It's a common plague in the string orchestra classroom. Some students don't even realize they're doing it...it's so easy to sit in rest position and casually pluck your instrument. Other students just can't wait to try the next new technique being taught, so they sneakily try to practice and pluck before it's time to play as a class. It's not fun to teach over the noise of plucking out of turn...and it can be distracting for other students who are trying to listen and internalize the lesson. Class time is so much more efficient if students stay with the teacher and only play/pluck when directed to do so.
Just before the end of the school year, I found myself saying the nagging phrase, "Stop plucking," over and over again. Sometimes I have students place their instruments on the floor so that it is not possible for them to pluck, but it takes time to put instruments down and pick them up again and I like to keep a very fast paced rehearsal. Every minute is important to me. Finally the thought came to me - 'I should just have them put their instruments is reverse rest-position!' That is how this strategy was born. When it is time for students to listen and not pluck, we go into reverse rest-position and it's like magic! Instant quiet, attentive students. You're welcome. :)
I've been asked to co-write a method book for beginning strings and it has been fun creating pages and developing a plan for my 'dream' method book. Last year, I spent a lot of time researching different books and many have great stuff...there is just not an ideal book for my classroom. I would like a book with a quality, simple rote section where students can easily read the exercises while focusing on what is most important...perfect position and quality sound. A book which incorporates multi-level parts to help reach all ability levels would be helpful. I believe that an option with more difficult parts included with easier parts helps motivate and inspire students to keep practicing in order to become advanced. It would be nice to have a book that allows students time to master new techniques, then apply those techniques with great sounding music.
One thing I want students to learn right from the start is how to create a quality sound. I just finished pages which teach bow direction/placement, bow weight and bow speed. Students can then practice those techniques on an easy exercise while reading bowings.
The bowing is meant to have students travel a short distance while stopping the bow after each quarter note so that students have time to keep checking bow direction, etc. They perform it like this:
What would you like to see in your dream method book?
The orchestra program at the high school where I taught this year is just beginning to grow. For many years, the orchestra program was run by the band teacher and it was difficult to retain students coming in from the junior high. I taught the high school orchestra this year to help retain students and to get the program back in shape. The high school orchestra doubled in size this year, but I am sad to say that I can't teach there again next year because of my full schedule at the junior high. My focus for the year has been to create a positive orchestra experience and help students transition to high school and stay in orchestra! I believe one way to do this is to highlight the seniors. At the end of the year, we had a concert which featured all of the seniors playing solos with orchestral accompaniment. I also gave each of the seniors a gift. I am hoping that other students in the program will want to stay in orchestra to get the same opportunities.
It was hard to choose a gift for my seniors. I searched online and could not find many ideas for orchestra gifts. I wanted to give them something meaningful. I finally settled on the book 'Mole Music' by David McPhail and a music journal that has staff paper on one side of each page and regular lined paper on the other side. At the concert, I had all of the seniors come up front and I talked to the audience about the importance of music education. I told the students about how they can now move forward to bless and inspire others with their talents because music makes a difference. I summarized the book for the audience - you should look it up on Amazon.com...it's a great story about a little mole to makes the world better as he practices his violin every day. I like the idea of the journal as well because the seniors have such a bright future where they can accomplish anything and I talked to them about opportunities to use their musical talent throughout their lives.
We all realize the importance of consistent practice, so it's hard to think that some students will go home for the summer and not play their instruments for a couple of months....especially after all of the hard work they did throughout the school year. A few days ago, I was looking out my window while eating breakfast and I noticed my blossoming Japanese snowball bush. It's amazing how large the blossoms grow in a short amount of time. I was thinking about how much my students had blossomed this year...I am so proud of their performances and accomplishments.
I cut a few branches off my bush and took them to school to show my students and tell my students how much they have progressed. It only took an hour for the flowers on my branches to begin to wilt. It made the perfect object lesson. After pointing out to students their progress, we talked about how the flowers wilt so soon after being separated from the tree. The same goes for practice over the summer...when you cut it off and don't get the nourishment of frequent practice, skill and ability begin to wilt. Talents need nourishment. Students took this message to heart and many committed to continue working over the summer. I made sure to have lists of private teachers available.
I have done a 2 week summer orchestra program in the past, but it is hard to find 2 consecutive weeks where students can commit to attend a daily activity. Now, I keep summer activities simple and no-stress for me and my students. I choose 3 days (each about 2 weeks apart) and hold a 'play-in.' For the last few days of playing in class, I passed out new exciting music and we worked on it a little bit so students could hear how it sounds and continue to work on it when school is out. Students are then invited to come on any or all of the selected summer dates to meet in my classroom and play the music. The cost is free, it doesn't take a lot of time, and students really like to come. Last summer, I had great attendance and students requested that I keep doing the play-ins as a summer activity.
It always feels so good to finish the last concert of the school year. Mine was last week. I usually have my final concert sometime during the 2nd week of May. That leaves about 1 1/2 weeks of school where students will still need to learn and play in class. One student came to my class after the concert was over and said, 'Can't we just watch a movie every day until school ends?' Students are feeling done with school, but I have to keep them busy or the last 2 weeks will be torturous. Sometimes, it gets hard to fill the time. Last year, I had students work as a class and in small ensembles from the Fiddlers Philharmonic and Jazz Philharmonic books to learn new styles. This year, I am having students work on sight-reading skills.
To begin, I show students the SRMachine App (using my iPad) by projecting the app on screen in front of the room using a projector.
I tell students that sight-reading is RHYTHM reading. If the rhythm is wrong, the music will not sound good, even if you play the correct notes. I demonstrate how to maneuver the settings of the app to adjust the music to our desired skill level. As a class, we pluck the rhythm on open D. It's super easy to do a few different examples and pluck the rhythm - and all students can do the rhythm, even if they don't read the clef that is used. If the settings are for violin, I next have the violins pluck the notes/rhythm while the rest of the class (who do not read treble clef, yet) plucks the rhythm on open D. I change the settings so that each section can take turns playing the notes while the other sections still participate by plucking the rhythms on open strings. My hope is that students will enjoy this enough to go purchase the app themselves and practice sight-reading at home.
After using the app, I gave students a worksheet to create their own sight-reading example. I told them to pretend that they were app developers and their job is to create sight-reading excerpts. They had to write it for their stand partner to perform. After completing the exercise, they would assess each other on their sight-reading abilities using the rubric at the bottom of the page. I walked around the room and made sure students were accurately writing rhythms, etc. Students seemed to enjoy the activity. For a follow-up, we practiced sight-reading orchestra music in class.
My district provides sample forms for reporting SLO outcomes, but I guess I am a more visual learner because I like to color-code my information so that I can easily see student progress and quickly identify students who may still need help. This year, I created SLO's for shifting and rhythm, but I was only required to do one for my assignment. At the start of the year, I gave my beginning orchestra classes a pre-assessment to determine their level of ability on rhythm and counting. Based on the results, I color code my class lists where I record scores. Using a highlighter, I color the names of the high level, mid-level and low level learners. As I record other grades and assignments, I can track each student to make sure they are progressing to higher levels of learning.
When turning in my SLO data, I like to visually see student progress throughout the year. Here are my SLO reports from this year. I blurred the student names for privacy reasons...but you can see the different colors and how I presented the data. (My pre-assessment and post-assessment tests have been posted previously on this site. Just do a search for SLO.)
The colored names on the left show student learning levels after the pre-assessment. The names on the right show the current level of the student after the final assessment.
Sometimes I stop conducting during a rehearsal and I watch my students. Do they notice that I have stopped conducting? Do they notice when they are falling apart? Do individuals notice when their tempo is different than everyone else's? Students can be so focused that they forget to listen and notice things happening in their surroundings.
A few summers ago, I took my kids to the local county fair and there was a 'ride' with giant inflated balls inside a shallow swimming pool. People could pay to get inside a ball and run around like a hamster. My children tried it and they had a great time. I attempted to get my kids' attention for a picture, but they were so focused on trying to stay upright inside the ball, they did not see or hear me. I share this story with my students and tell them not to play 'inside a bubble.' I remind them to listen and to perform as a team. The story helps, but students really need to practice listening and being attentive while performing. Here are a few ideas:
1. InTune
I recently purchased this app to use for ear training in my classes. It's very basic and easy to use. Two tones are played and you must decide whether the 2nd pitch is higher or lower than the first pitch. It starts pretty easy, but by level 5 it becomes tricky. To play it with my class, I plug my phone into my speakers and let students hear the pitches. They give me a thumbs up if they believe the 2nd pitch is higher and a thumbs down if they think the 2nd pitch is lower. I answer on my phone based on the majority. It is interesting to see student responses...many students really need this kind of training to develop a more refined sense of pitch. This game takes very little time, so it works great during a warm-up routine. Even though the game is simple, students have not been bored when doing this in class. Several of my students went home and purchased the app to try to get a higher score than me. After playing this game, I feel students listen more closely to intonation and pitch while rehearsing during class.
2. GlowSticks/Conducting
My students performed at a festival last week and the judges made comments to my class about how they need to listen to each other. They performed well, but almost fell apart in one section of the music because the back of the orchestra was a tiny bit behind the front. This is because I have 2 classes of beginners (100 total) and we do not have an opportunity to rehearse together. I teach the same music...we were just not able to combine for a rehearsal due to testing at the school and other teachers not allowing students to miss their classes. Both of my classes knew the music and could stay together in class. It's hard to see and hear when you find yourself in the back few rows of such a large orchestra. After the festival, I started to brainstorm ways I could help my students be more prepared in the future. A combined rehearsal would definitely help, but students must also learn to listen, count, and follow a conductor.
Recently I picked up a few cases of glowsticks and I had them in my office because I thought they might come in handy. As students entered class one day, I had them pick up one glowstick and place it on their music stand. We watched a quick video of the week about conducting and we discussed the purpose of a conductor:
After we were all settled, I turned out the lights and my classroom has no windows, so it was totally dark inside. In the blackness, I taught students how to hold their glowsticks like batons and I taught them how to conduct 4/4, 3/4 and 2/4 times. We could easily see when a student was not keeping the beat or moving the right direction because of the glowsticks. We practice following a conductor in the darkness. I directed various tempos and beats while students had to tap the glowstick on their hand in the air to stay with my beats. Students LOVED this exercise and even my advanced class was enthralled. It was a great visual - students could SEE whether they were together or not. I tried some pics, but it was dark, so it's hard to capture the true awesomeness of this exercise.
Here's a video with an example of students trying to stay with a beat...I was holding my phone and not conducting, so you can see they are not totally together:
3. Musical Chairs
On Friday, I could tell my students were getting tired of rehearsing our concert music yet again. We had already performed the music at festival, and we know it well. I wanted to have a productive rehearsal and listening skills were on my mind. To liven things up, I allowed all students to sit where-ever they wanted in the classroom. There were basses at the front of the room...violas, cellos, and violins all mixed up. We then played our concert pieces and it was like a new experience for students! They noticed other parts - melodies and harmonies. They made many insightful comments and agreed that it was easier to listen to each other when they were mixed up. They could hear themselves better with other parts around them. Students had to focus on playing their music exactly to fit with the other parts that were so close. I will definitely do this more often with my students. It allowed students to practice everything I wanted: listening, counting, awareness.
I hope you found something useful to help your classes learn to listen. Happy rehearsing, everyone!
I have written about GradeCam before (www.gradecam.com), but I haven't posted some of my latest ideas about using that resource in an orchestra class. My program has been growing, and grading takes me forever because I teach so many students. This year, I teach 260 students, and next year I'll have 280. Just grading simple assignments can take hours - and I'd rather be spending my time creating awesome lesson plans. Anything I can do to make grading easier makes my job better.
One thing I like about GradeCam is that you can change the bubble sheets to fit unique assignments. You would think that bubble sheets wouldn't work in a music performance class, but I found some fun ways to use them.
1. Bellwork
I frequently give my students bellwork - especially my beginning classes because I like them to have something to work on while I tune everyone. But, daily bellwork for many students means a LOT of after school grading. My bellwork assignments are very simple...they are just a way to check for understanding. I give students credit just for completing the work - even if it is wrong. If a student gets their assignment wrong, I try to pull them aside sometime the next day to re-teach or clarify and bring that student back on track. But, I'll be honest. Some days, I don't have time to get all of the bellwork graded. There have been days that I have not even looked at the answers on the bellwork and I have thrown them away. I realize that is diminishing my effectiveness.
GradeCam is a great solution to help me use my bellwork in the way I intend. It saves so much time on grading that I can quickly look through the papers and get help to students who need it. All I do is print the GradeCam blank score sheets - 4 per page. Student write answers to bellwork on the back of the paper and they fill out their score on the bubbles. Then my TA quickly scans each paper using my iPad and she is finished in minutes. I usually have a student TA to help me out at least one period per day, but if I didn't have a TA, I might have students scan their own paper as they leave the class as an exit procedure.
2, Note-reading? Who knew?
Since you can customize the bubble forms, it is pretty easy to create a form that has letters A-G for each question. Students can complete fast, easy note-reading assignments using these specialized forms. I just created a note-naming final using GradeCam. It was so easy to make because I didn't have to write individual questions. I used Finale to create a musical except containing all the notes I expect beginning students to know by the end of the year. The measure numbers correspond to the numbers on the bubble forms. GradeCam helps the actual grading go way faster, but it also provides me with very helpful data. For example, I can find out if a lot of students are getting the same notes wrong. I can then customize my lessons to help those students become strong on note-reading specific notes as needed. This would be super helpful for those doing a note-reading SLO. (I chose to do my SLO on rhythm this year.)
3. Rhythm, too?
After I created the note-reading assignment, I began to brainstorm ideas on how I could have students write counting using a GradeCam form. I came up with an assignment, but I haven't given it to my students, yet. I have enjoyed experimenting and coming up with new ideas to use this resource more frequently in my classroom. I customized this form using the 'number grid' option.
I'll write more about training students to use the GradeCam forms. I have found it to be quick and easy - but it is important that all students understand how to fill out the forms correctly to avoid issues with scanning.
I'm excited about the many possibilities of GradeCam to make my life easier. Happy grading, everyone!
Spring time is festival season for my orchestra classes and every day we work extra hard to perfect our pieces. A couple weeks before festivals, I change the format of my rehearsals so that I am not teaching new concepts and we focus only on our concert music. I try to keep the class working intensely while keeping a quick pace to make as much progress as possible . I appreciate the work that my students do in my class. I want them to learn to work hard, but I also want them to have fun. After a long week of diligent practice, I played a simple game with my classes to re-energize them and get them ready for yet another rehearsal.
This game is super simple, but it changed the atmosphere of my class to be fun and it helped students to re-commit to do their best. For the game, I asked questions to a student volunteer. The student was only allowed to answer with one word ...a word that I selected....and they had to say that word without smiling and laughing. We talked about how intensely one must concentrate and focus in order to NOT smile. For example, one word might be 'sausage.' I asked questions, and the student had to say 'sausage' in response to every question. Other funny words could be: pickle, dandruff, slugs...
After I demonstrated the game by asking a few students questions, I wanted to entire class to have the opportunity, so I let stand partners ask each other questions. It was so fun to watch my students interact with each other and have fun for a few minutes. We all needed a few minutes to laugh. It's a silly game, but students really took the message to heart. They were able to concentrate and work through another rehearsal and they did a great job.